This article is about the part 2 in the collection of Sitecore Docker. In this part, I will go through step by step to install Sitecore 10 update 1 (10.0.1) on Docker Desktop for Windows. For part 1, you can see here. Let’s get started!
Software Prerequisites
- Windows 10 Professional or Enterprise version 1809 (2019 LTSC) or later. Version 1909 is recommended for enabling isolation.
- Hyper-V is enabled.
- Docker Desktop for Windows.
- Docker Compose.
- 16GB of RAM is the minimum, 32GB of RAM is recommended. The 32GB RAM requirement will somewhat depend on the number of instances and which topologies you plan to run. For example, you might be able to work with 16GB of RAM for an XP Workstation (XP0) or XM Server (XM1) instance, but will likely experience issues running a full XP Server (XP1) instance.
- CPU Quad Core or higher.
- At least 25GB of free disk space (SSD disks strongly recommended)
- Ensure ports 443, 8079, 8080, 8984, 14330 available. Otherwise, your container(s) will fail to run.
- Sitecore license file
- Sitecore 10.0.1 Container Deployment Package
Installation
Step 1: Enable Hyper-V which allows us to run multiple operating system as VM’s on Windows. To enable it, refer to the Microsoft documentation. The Docker Desktop installer will also enable Hyper-V if necessary, but a machine restart will be required during install.
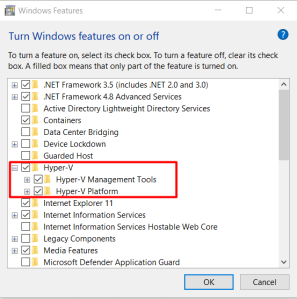
FYI: You can also use PowerShell as admin to run following command to enable Hyper-V
Enable-WindowsOptionalFeature -Online -FeatureName $("Microsoft-Hyper-V", "Containers") -all
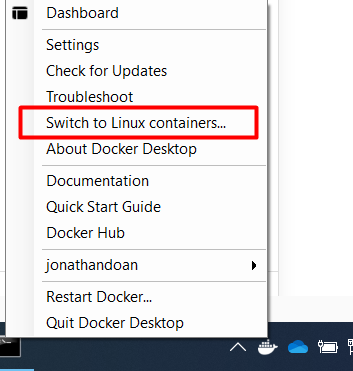
Step 2: Download and install Docker Desktop for Windows. During installation, choose to use Windows containers instead of Linux containers. Once Docker Desktop has installed, make sure you are in Windows containers as below:
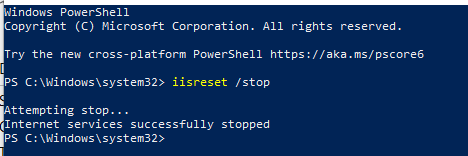
Open PowerShell as administrator and using command below to stop IIS that will ensure that all required ports are available and not being used by another process
iisreset /stop
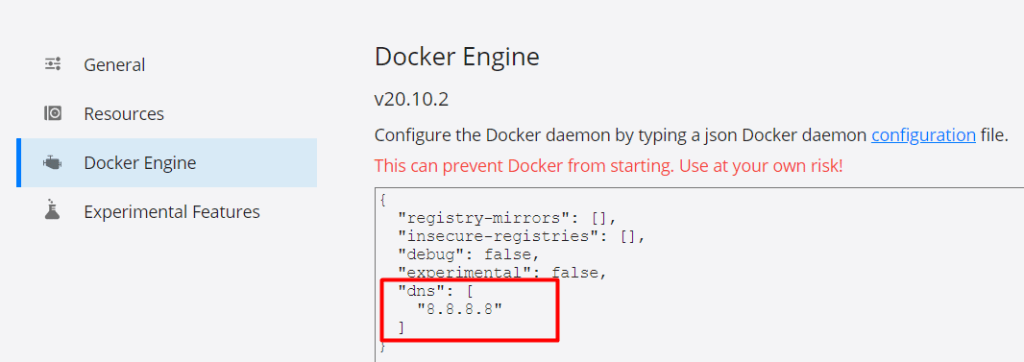
Open Docker Settings and add “dns” as below. It will help to resolve some network issues. Restarting Docker is required.
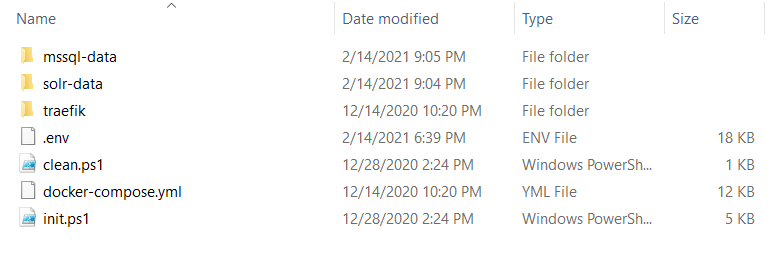
Step 3: Create a folder on your local, let says D:\sitecore\docker and to which download and extract the Sitecore 10.0.1 Container Deployment Package. Rename the package with “SitecoreXPDocker“. Navigate to D:\sitecore\docker\SitecoreXPDocker\compose\ltsc2019\xp0. As we can see, the structure is the same as Sitecore Docker Example Repository. Download init.ps1 and put to this folder. For more details about folders and files, see my part 1. In this step, I want to explain and explore more details about the file init.ps1 which is used to initialize the Sitecore installation on Docker.
Actually, without init.ps1, definitely, we are able to install Sitecore on Docker. However, it requires more steps such as installing SitecoreDockerTools, convert license file, generate certificates and populate environment file (.env file) for variables:
- SITECORE_ADMIN_PASSWORD
- SQL_SA_PASSWORD
- TELERIK_ENCRYPTION_KEY
- SITECORE_IDSECRET
- SITECORE_ID_CERTIFICATE
- SITECORE_ID_CERTIFICATE_PASSWORD
- SITECORE_LICENSE
Open the init.ps1 to see the script:
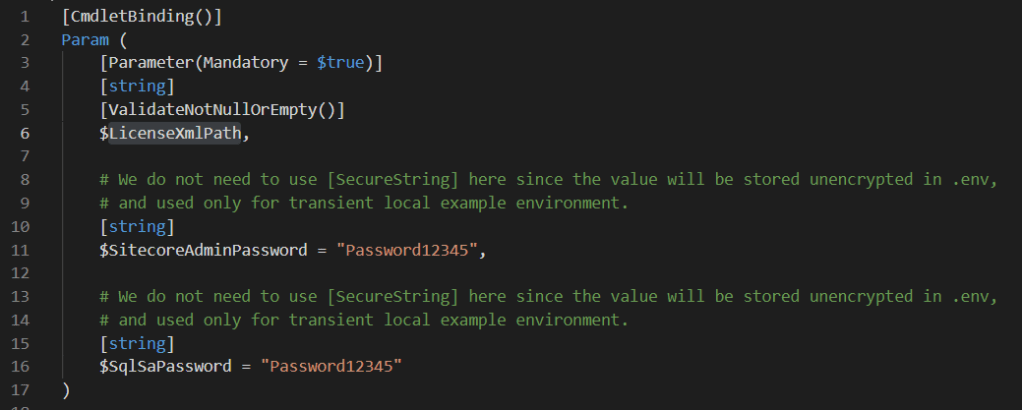
The parameter input when we run. It requires the path of your Sitecore license.
- $SitecoreAdminPassword: the Sitecore admin password to login into Sitecore
- $SqlSaPassword: the MSSQL “sa” password. You should ensure that the password meets the following Microsoft requirements:
- The password does not contain the account name of the user.
- The password is at least eight characters long.
- The password contains characters from three of the following four categories:
- Latin uppercase letters (A through Z)
- Latin lowercase letters (a through z)
- Base 10 digits (0 through 9)
- Non-alphanumeric characters such as: exclamation point (!), dollar sign ($), number sign (#), or percent (%).
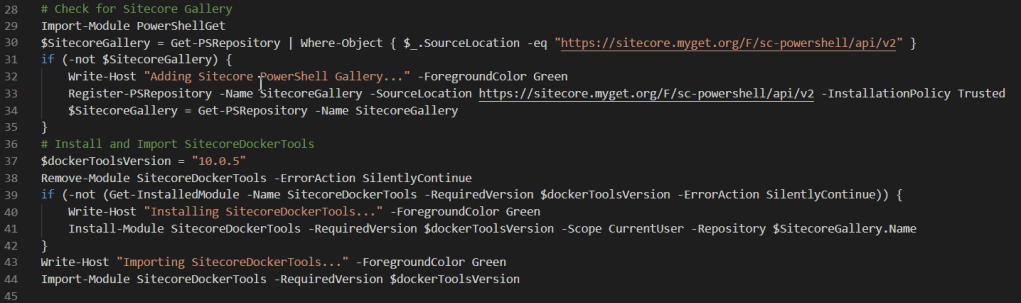
These lines of script check the Sitecore Gallery and install the SitecoreDockerTools so that we can leverage its various cmdlets to generate and populate values for environment variables above.

The line 72 is about converting the license file for use with containers. Actually, there are 2 ways to convert this file: by compressing or mounting.
- Compressing: The Sitecore license file is large and we must compress and Based64 encode it to conform with the maximum sized allowed by Windows for all the environment variables. With
SitecoreDockerTools, theConvertTo-CompressedBase64Stringcmdlet makes this easy. - Mounting: it is an alternative to using the
.envfile. You will need to use this way if you find that the file is still incompatible after you compress and encode it. It can be also useful in development perspectives when you wish to have a single location from which to update the license file used by multiple Sitecore environments.
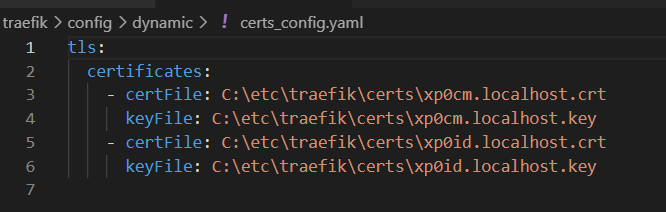
Now, we will configure HTTPS certificate and Windows Hosts File. In the certs_config.yaml, we can see that this is also using the volume-mounted path C:\etc\traefik referencing certificate files in the certs folder.

This script generates the HTTPS certificates, which ensure the secure communication between the browser and the HTTPS reverse proxy container. This is accomplished with the help of mkcert. The mkcert can be installed by downloading from Windows or using Chocolatey.
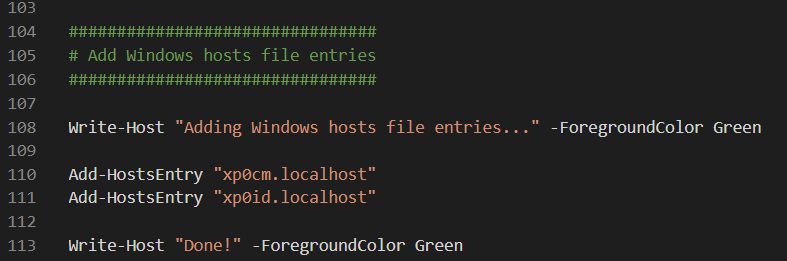
Add Windows Hosts File Entries. The Windows hosts file enables you to access your Sitecore environment using the IP address. In containers, the reverse proxy is used to resolve the hostnames using HTTPS for multiple containers.

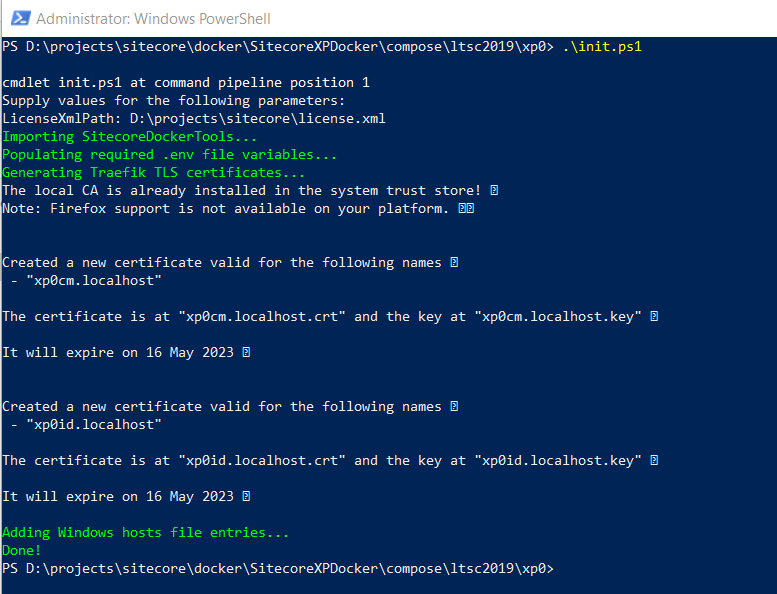
Open PowerShell as administrator and run init.ps1 with your license path.
Step 4: To start Sitecore, you can use a Docker Compose command. At D:\sitecore\docker\SitecoreXPDocker\compose\ltsc2019\xp0, run “docker-compose up -d” on PowerShell. This will do a few things:
- Download all required images from the Sitecore Container Registry
- Create a default network to use
- Create a container for each configured service, and
- Start the containers with their configured ENTRYPOINTS.
If everything is running well. We will see this result.

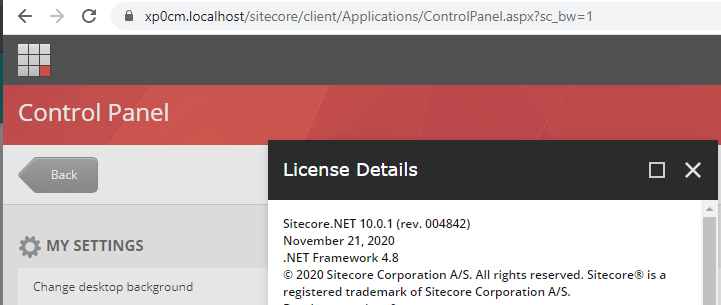
Browse to https://xp0cm.localhost and you should see the Sitecore default website.
Now, browse to https://xp0cm.localhost/sitecore and verify you can log in to Sitecore. Use “admin” for the username and the value you specified for SITECORE_ADMIN_PASSWORD in the .env file (“Password12345” by default in init.ps1) for the password.
You can also access additional containers:
- Sitecore Content Management (CM) = https://xp0cm.localhost
- Sitecore xConnect Server (xConnect) = http://localhost:8081
- Sitecore Identity Server (ID) = https://xp0id.localhost
- Apache Solr (Solr) = http://localhost:8984
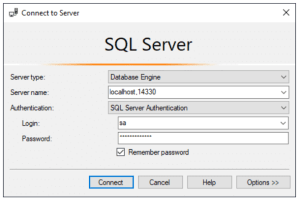
- Microsoft SQL Server (MSSQL) = localhost,14330. If you are using MSSQL Management Studio, you can access Sitecore databases on Docker
As the last and final step, clean up the workstation. In containers, you can stop or completely remove a workstation environment.
- To stop a Docker Compose environment without removing its contents, run:.\docker-compose.exe stop
- To resume a previously stopped Docker Compose environment, run: .\docker-compose.exe start
- To remove a Docker Compose environment and all the non-mounted volumes, run: .\docker-compose.exe down
Issues You May Get
1. Cannot start service Solr

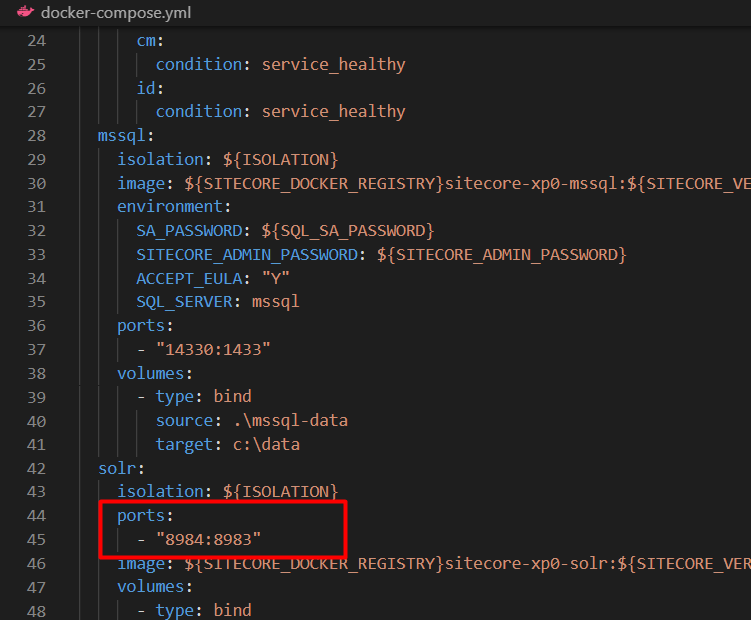
We should ensure that the port 8984 available and is not being used by another process. If we look at how Solr is defined in the docker-compose.yml file, we will see that the port is setup to map to 8984 on your local machine to 8983 on the running Solr container.
Also, you should check if you are having multiple Solr instances running on your machine from previous installed Sitecore instances. For me, I needed to stop the Solr service highlighted below because it’s using port 8984.

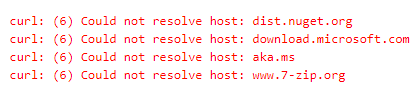
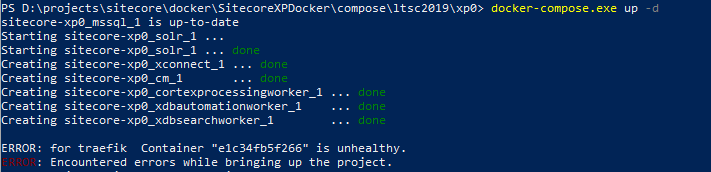
2. ERROR: for traefik Container “xxxxxxx” is unhealthy.
To address this issue, try the below steps:
- Open PowerShell with admin right.
- Run “
docker-compose stop“. - Run “
docker-compose down“. - Now run “
iisreset /stop” to make sure that the required ports are free. - Now run “
docker-compose up -d".
If it still doesn’t work:
- Please check if you are using VPN. Turning on VPN can also cause problem when start up Docker.
- SQL password: please make sure SQL password in SQL_SA_PASSWORD to fit the default SQL Server policy as mentioned above. After changing the password in the
.envfile, you would need to clean up the already generated database files. This is accomplishing by running theclean.ps1. You can also manually delete its content undermssql-datafolder. Please note that Docker should be stopped and downed first.
Thanks for reading and happy Sitecore Docker!
References:
- Installation Guide for Developer Workstation with Containers
- https://doc.sitecore.com/developers/100/developer-tools/en/containers-in-sitecore-development.html
- https://doc.sitecore.com/developers/100/developer-tools/en/troubleshooting-docker.html
- https://sitecore.stackexchange.com/questions/26777/error-container-is-unhealthy
- https://www.sitecoregabe.com/2020/08/sitecore-10-docker-containers-cannot-start-solr.html.html
- https://www.sitecoregabe.com/2019/10/sitecore-docker-setup-curl-6-could-not.html
Related Articles:
